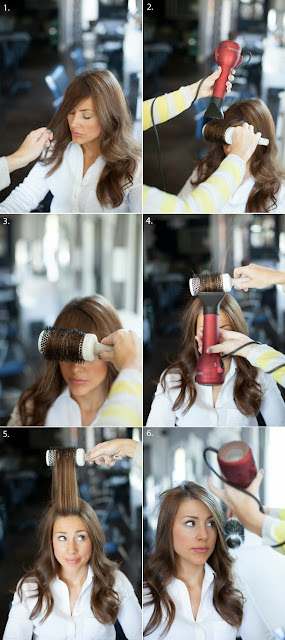
If the new year has you itching to update your look but you’re hesitant to do something drastic, then changing up your part might be just what the doctor ordered! The side “swoop” bang is super low maintenance and can give your look a little update that’s a much lower commitment than chopping true bangs. While it’s easy to do yourself, there are a few tricks you’ll need to master if you want to get that perfectly voluminous swoop that we see in magazines. Here’s how to do it…
- Part your hair far to the side (past the arch of your brow) so that it will swoop across. Dry all your hair, leaving the bangs for last. Then re-wet the bangs with a little water or spray bottle.
- With a large round brush placed underneath the bangs, pull hair straight down in front of you and blow dry on top. Don’t worry about pulling bangs to the side yet.
- Once bangs are mostly dry, place the brush in front of bangs and start rolling it back while pulling in a forward motion, as pictured. Blow dry as you roll.
- Roll bangs until they’re sitting right at the front hairline. Allow hair to cool by holding brush in place or using a cool blast from the blow dryer — this will set the curl and give the most volume.
- Once bangs have set, pull the brush up and let bangs fall to the side. The volume and curl you have created should allow the hair to naturally “swoop”.
- Spray the hair underneath the bangs to help them stay to the side or to fight any tricky cowlicks.
Blogger : Catherine BellPhoto : source
Anyone else still obsessed with fishtail braids? Martha Lynn here, and there’s nothing I love more than a style that can accomplish two things at once, and a “half-up” look manages to give you the best of both worlds — the romantic feel of your hair down, partnered with the polished look of an updo. This simple technique takes your average “half-up” style and turns it up a notch by pairing it with a couple of fishtail braids… the end result is gorgeous, whimsical and super versatile.
- Start with hair in your natural part. Divide hair in front of the ear into two sections as pictured.
- Start fishtailing the hair. If you still haven’t mastered the fish tail technique check out Claire’s tutorial .
- Once the first fishtail is complete, secure with clip.
- Braid second fishtail on other side of part and gather both braids at the ends.
- Secure with a clear rubber band. Wiggle the rubber band down a tiny bit to loosen the braids.
- Carefully tug on braids to loosen them up — the more you pull them apart, the larger they will be. Use a comb or fingers to pull hair at crown to add volume.
- Curl remaining hair at the bottom. When curling, alternate directions so curls stay separated
- Set with hairspray.
Blogger : Catherine bellPhoto : source

